(NOTE: This guide is intended for Windows users. If you are using Mac OSX, see the ShakesPeer setup guide.)
About
DC++ is a Direct Connect peer-to-peer file sharing program used among many members of the Cornell community. It allows students to share files across Cornell's local area network without using up their monthly bandwidth allowance or being susceptible to outside threats. It is a student-run network and is in no way supported by the Cornell Information Technologies (CIT) department. It is perfectly legal as long as none of the files transferred violate copyright laws.
Download & Installation
- Go to the DC++ download page and download the most recent stable version, e.g. "DC++ v0.75 (Installer)". For a direct download there is a locally hosted version (Right Click > Save Target As...).
- Save the .exe to your download directory or desktop, or somewhere else you will remember.
- Run the installer and follow the instructions. You should be fine using all of the default options and clicking "Next" all the way through.
- Run the program by going to the Start Menu > All Programs > DC++ > DC++. You may also want to create a shortcut on your desktop.
- When DC++ first launches, a number of windows will pop up. If you get a Windows Security Alert, you should click "Unblock" to prevent Windows Firewall from blocking features of the program. Also close the Help window - if you need this later you can access it from the Help menu or by pressing F1. The Settings window should be open - if it is not, open it by going to File > Settings...
Settings
Personal Information
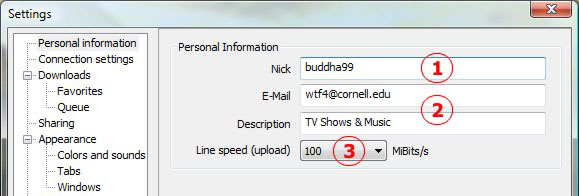
- Choose a nickname and type it in the "Nick" field. It can be anything you want, but you should try to avoid common names because duplicate nicknames are not allowed, and you will not be able to connect.
- E-mail and Description fields can be left blank, but you can put your e-mail and a brief description of your files if you want.
- You should select a Line speed in accordance with your upload speed. If you are unsure what your line speed is, you can check the Connection speeds page to see what speed your housing has or leave it at the default value. Typical speeds on Cornell's campus are 10 Mb/s for wireless and 100 Mb/s for wired transfer.
Connection Settings
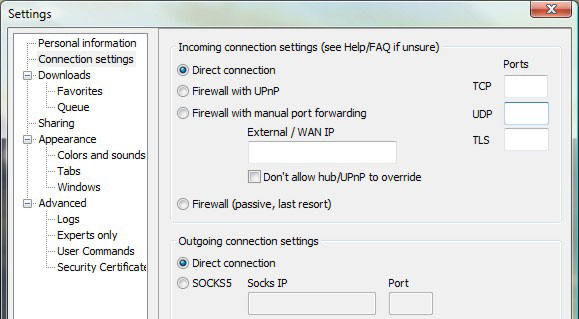
- If you have a normal setup, you should be able to leave these settings at their default ("Direction connection" for both incoming and outgoing connections). If you are having trouble connecting or are behind a personal router, you will either have to open up ports using manual port forwarding or use the passive option as a last resort. See this Troubleshooting FAQ if you are having trouble with your connection to the hub.
Downloads
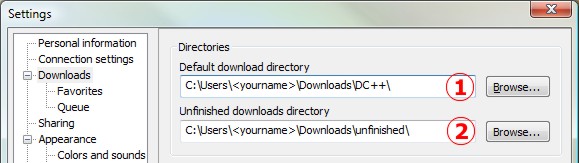
- Set up your default download directory. Click "Browse..." next to "Default download directory" and navigate to a directory or create a folder where you would like all of the files you download to go (e.g. your Downloads folder).
- Set up a directory for your unfinished downloads. NOTE: It is extremely important that you are not sharing your unfinished downloads folder (see the section on "Sharing" below). Click "Browse..." next to "Unfinished downloads directory" and choose a directory or create a folder that you will not be sharing.
- You can leave the rest of the settings at their default values. "Limits" sets limits on connections and speeds if you want to restrict your own downloading for some reason. Keep in mind that all transfers are done within Cornell's Local Area Network and will NOT be charged to your network usage bill.
Sharing
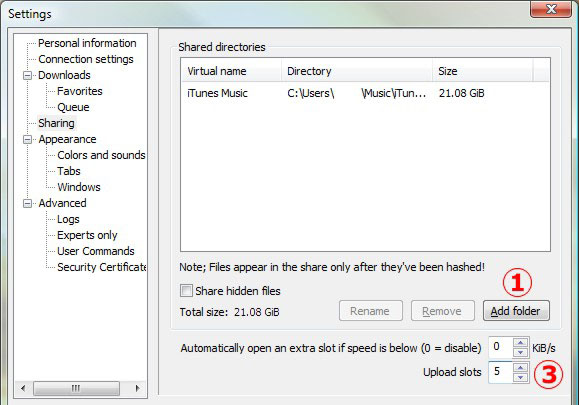
- Set up your shared folder(s). Click the "Add Folder" button and navigate to a folder you would like to share and click "OK". A window will pop up asking you to type a "Virtual name" for the folder - this is the name that other users will see when they look at your files or download from you. It is usually fine to leave it as the default folder name.
- After you click "OK" a window will pop up that says it is hasing your files. If you have a lot of files, you may want to click "Run in background" so you can continue with the rest of the setup. This process is adding all of the files in the directory you selected as well as all files in sub-directories to your file list, and adding up the total size of all of your files. NOTE: You must have at least 2.0 GB (2048 MB) of files shared in order to connect to the hub. Continue to share folders until your "Total size" is greater than 2.0 GiB. Typically, an easy way to do this is to share your Music folder. [If you are using passive mode in connection settings, you must share at least 5.0 GB]
- At the bottom, change the number of "Upload slots" to 5 or more. This is the number of users who can simultaneously download from you. NOTE: If you set your number of upload slots too low, you will not be able to connect to the hub.
- Make sure you look at the Sharing guide for appropriate usage.
Appearance (Optional)
- If you would look to change the look and feel of your DC++ client, play around with these options (e.g. the "Colors and sounds" tab). You can also set options for tabs, windows and a few other things
Advanced (Optional)
- This section is for advanced users only. If you are new, you should leave this alone and move along. One useful function of this section is for logs if you would like to log your computer's download/uplaod activity. This is located under the Logs tab.
Connecting to Cornell's Private Hub (THCHub)
- Open up the Favorite Hubs window by click on the yellow star button
 below the menu bar.
 - Click the "New..." button at the bottom. A window titled "Favorite Hub Properties" will pop up.
- In the "Name" field type the name of the hub, i.e. THCHub
- In the "Address" field type the hub's address: thchub.no-ip.org:3307
- Click the OK button, and then make sure to click the checkbox next to the name of the hub so that DC++ will automatically connect to this hub when open the program (or else you will have to manually connect).
- Connect to the hub by double-clicking it or pressing the "Connect" button with the hub selected.
- If you get any errors, the hub will tell you what is wrong. If you cannot figure out how to fix them, see this Troubleshooting FAQ.
Pointers for Using DC++
- The main hub window is for chat and status messages only. To perform a search, click the magnifying glass button
 or press Ctrl+S.
 - In the search tab, you will see many search options, including file type (video, audio, etc). Click search and double-click the file you want to download in the window on the right. It will download to your "Default downloads directory" set in the Downloads section of Settings.
- To view a user's files, either double-click their name from the list of users on the right side of the main page, or right-click their name anywhere you see it and select "Get file list."